Sketchup Screenshot

Sketchup Screenshot
Above image © De Santis-Philipson Architects. All other Images © Scott Miller 2010 unless stated otherwise

Saturday 4 December 2010

The Finished (until it's Marked!) Model


The Final Week


This week has been intense. I have been working constantly hence no blog update till now. I have been in the studio from 08:30 each morning till 21:30 every night apart from Thursday which was impossible as we all got thrown out at 16:30 becuase of the snowy conditions. Luckily Stuart brought his car and I was able to take the whole project back to our house to work on it through the night (below).

I have structured each day to allow me to use the workshop as a priority whilst thinking ahead to what job's I can do once I have the parts from there. That way the majority of evenings were spent assembling and preparing and masking for spraying and or modification the following day.

The Main Model

Assembly of the main model has been quite smooth. I was able to work as a sortof assembly line with the buttress joints on the model, setting one up to dry whilst moving on to another then coming back to the next part (below).


The smaller buttress sections at the front of the building were particularaly difficult to assemble. I suppose this is something I should have considered earlier in the project. Either way I got it done (below)


Time consuming but essential details were mainly made a night such as the ridges that run along the walls and roof line. These were made at cost to my hands! I have never cut myself so many times trying to make something!

The Roof

I have underestimated this element of models I've made in the past and have done it again. The sections of roof I was able to get cut were fine apart from the smaller wings near the existing main entrance. The parts were rush produced with limited material as I only had enough to make each part once. Needless to say when one section split I was gutted (below on the right of the roof). I applied it anyway to get the building together in time but only loosely to allow me to removing in future

This is the main thing I am unhappy with on the model as I didn't have to the time to do it properly. I hope to come back to this element of the model and remake the whole section to a higher standard before handing it over to the architects in January.

Base Work

I knew that in order to be able to understand how well the building was going to fit together it would have to be fully in situe on the base. This made getting the base details finished and the sections sprayed a priority. In heinsight I should have used a lighter green for the green areas and trees. IThe colour really needed to be more light to draw attention away from the grass areas imballance around the building. This decision, which I regret was rushed through as the base was being brought up to condition to recieve the model. Other details were the surrounding low walls with planters, high brick walls and the road area, all of which needed paint consideration (below).

Last weekend I went to several local model shops but was unable to find any trees that I felt were correct for the styling of my model as well as being the correct size. Luckily Paul provided some that were perfect and in stock at the studio which I had no idea about prior to Chris Wood using them on his model. I sprayed these trees in the same green colour I used on the base.

At the last minute I made a minor error in cutting the 45 degree angle of the base Foamaulx cladding on the wrong side! I knew there was a risk this part would go wrong as I only had enough material to cover each side. Paul and Will assured me that is wasnt a big issue as the exposed side had a good finish anyway and my mark would not be affected.

Laser Cutting

Once again I needed to cut new and edited parts within time to allow me to prep and paint them before assembly. Unfortunatly the earliest slot was 1:30 Wednesday afternoon which didn't leave much room for error. I made sure I had all of the drawings I needed by that slot which I expected to take me about an hour and a half. It took 4 and a half! I should have known as with the bricks, the job took about 25minutes to process which really slowed the process down. I prioritised as I went and cut the smaller details to all me to paint them whilst the roof sections were cutting. This saved me alot of hasstle as the paint was dry by the time I finished and I was able to assemble them that evening.
Brass Etching

All of the brass etched details folded togther better than I could have hoped for (below). Several of the chairs had not been etched correctly leaving part of the 'leg section' whole. I can only assume some of the data wasn't carried over during the etching porcess as the drawings were all copied directly from a master net drawing for the chair. This is a minor issue that will most likely never be picked on once all the chairs are in place anyway.


In order to ensure the parts take the paint without flaking I acid etched them all with an etch primer. This effectivly 'eats' into the surface to give the paint a key to bond to before spraying (below).


Case Making

Due to other elements of the project running over their allowed time I decided that the case was less of a priority for the deadline given that I am marked on the quality of the model foremost. I still made an effort to try and get it finished and intend to do so as soon as the project has been assessed. I spoke to Neil and Jeremy in the workshop regarding the use of the router to trim the case overhang as I had done at Technical Models over the summer. They didn't think the router blades they had on stock could deal with the 6mm overhang. In order to be sure of what I needed to use I rang Dave Bateman from Tech Models who told me to buy the standard tungston bearing blades (below) available at the majority of DIY places.

I purchased one from B &Q for about £15 early on Wednesday and went in to route of the edges(below).

As I expected, there are a few bubbles in the Tensol joint I was unable to fill which have become exposed. Once I have to the time post deadline I will fix this issue and polish the case. A technique I'll experiment with which I didn't use at Tech Models was flame polishing. I found a couple of useful guides online which will be very useful when I come to having a go myself.

Saturday 27 November 2010

Late nights

The last few days have been very long and very productive.


Painting


On Thursday I mixed up the main colours for the building so I could press on and get things sprayed. The main time consuming factor in this part of the process is the painting/masking (below) of each part. As I have created a sort of air fix kit of parts if you like, there is often multiple colours required for each part. I have had a few cases of paint running under masking where I didn't want it to. This has held me up slightly as I have had to the remask, go back to the spray room and try again, cleaning the gun out after each colour is time consuming but essential for a clean crisp coat. Paul recommended a higher spray pressure and or spraying from an increased distance to ensure the paint lands and flattens itself instantly as it hits the surface not giving it tme to go under the masked areas.


Laser Cutting

On Friday I was once again booked on the laser cutter to recut certain parts that need to be redesigned. The main new additions to the drawings were the new build roof sections which I designed to allow internal viewing as discussed with the architect. I have booked on again for next Wednsday for the cutting of final parts which I have yet to draw. These parts rely on the ongoing assembly of the model to allow me to understand exactly how the need to fit into place. The major part here will be the roof for the front of the existing church. As with all other parts they will then have to be sprayed and fitted.

Assembly

Assembly of the model has been fairly smooth. The addition of the painted parts really starts to bring the whole model to life. 95% of the parts have been painted and the others are being sprayed first thing monday morning or when available (from the laser cutter). Once ready I will be able to assemble the building very quickly. One issue I have had which has had to be altered on the existing parts due to the time constraints is the step into the walls that I had allowed for the floor level to fit within have all been wrong. This is purly down to me forgetting to take the extra 2mm out of the parts to allow the floor to sit flush with each other. This is'nt too big of a problem as I am easily able to modify parts that arn't visable one the model is fully assembled.

For now the pictures below tell my progress:


Brass Etchings

The brass etchings arrived today and look great. I am unsure as to weather I should leave them in their brass finish or not. They look great as the y are but I think it may contrast a little with the rest of the colour scheme on the model. The main reason I decided to use brass was its flexibility and the amount of detail that can be achived at such small scale. I will check with the architects before taking this further.


Case Making

As the model has really started to take shape in the last few days I have put the case on hold as I figured it is more important for me to get the model finished than the case which although an important part of the finished project will not play a huge role in the assesment by the tutors. Model progress pending, I still hope to get it finished for the deadline next Friday.

Tick Tock Tick Tock....

Wednesday 24 November 2010

More of the usual plus the start construction

Laser Cutting


Got off to a flying start today cutting the interior pieces and the odd redrawn parts I drew yeasterday. No problems at all finished well ahead of time.

Case Making


The Tensol I applied yesterday had completely gone off so I was able to look at the quality of the joints. Unfortunatly there are a few more bubbles that I had hoped for. I cut out the weak sections as best I could and re injected Tensol where possible. I will likely do the same tomorrow making sure the joints are a clear as I can make them. I can only really put this error down to me rushing perhaps abit too much to get things moving. Paul suggested I experimented using flame polishing to speed up the polishing process when I get to it. It look interesting and there is alot of information on the subject online such as this demonstration video: http://www.youtube.com/watch?v=kRCnVBM3R0c
For now the priority lies with the main model which is more improtant interms of the overall mark.

Painting

I painted the 2mm sections with the terracotta colour ensuring there was a good even coat which I had some minor issues with on my samples. Once dry I was able to take these parts and begin assembly or further masking for interior colours.

Assembly

I was finally able to start the assembly of some of the parts of the church. The main hold up is the need to have certain parts painted before being able to fix them in place. I hope to speed this up tomorrow and get all of the colours mixed and as many parts as possible painted.

I decided to use the emulsion or 'tacky glue' along with double sided tape to fix the layers in place (Below). This is mainly due to the paint being exposed on the inside preventing the use of glues or solvents.


The jigsaw jointing is working well on the first piece I have put together with minimal fuss in terms of fitting of the parts (below).


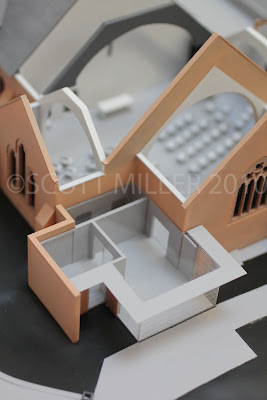
I also assembled the bulk of the interior sections for the new build's in preparation for the interior colour spray tomorrow (below).

It has not been specified whether or not the floor will be a different colur to the walls. I will see how this section looks and will check with architects. Another decision I have made without consulting them is to backspray the windows themselfs matte black. This decision is based on the advice I recieved at Technical Models Ltd as well as my need to conceal the area at the front of the church which has no interior representation.

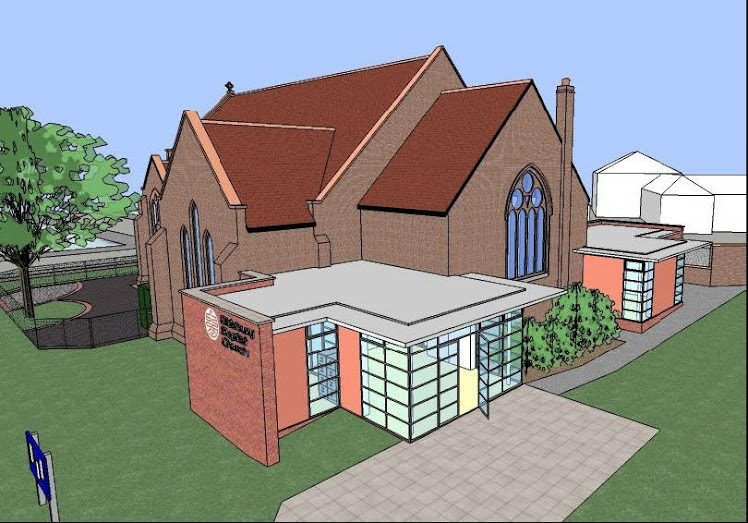
It's good to see the elevations finally coming together!

Redraws

Inevitably I have come across a few minor problems with parts as I have come to assemble them. I have recitfied the drawings and will have to cut this few parts again along with new roof parts which I intend to cut on my Friday morning laser session (or before if I can get on the cutter).

Brass Etching Update

I recieved a reply for PPD regarding cost of the job. They have completed it and sent it out today with the total cost coming to £35 + VAT = £41.13. I just hope these details are worth it!

Tomorrow

I intend to keep up the pace and get as many jobs for the main model done as possible aiming to have the bulk of it constructed by the weekend. I have to prepare the roof drawings to be cut on Friday!